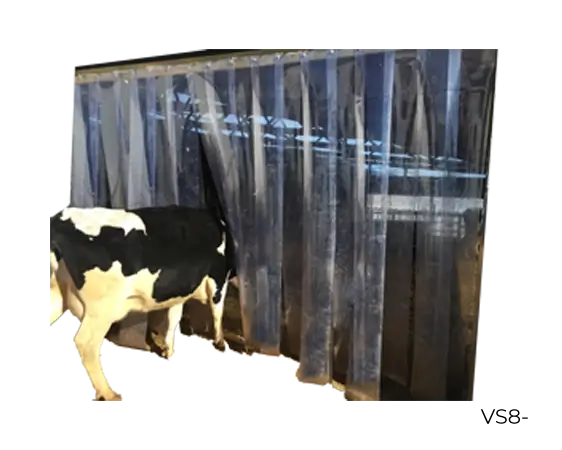
Roth Vinyl-Strip Doors
Vinyl-Strip Doors are a practical solution for maintaining climate control and cleanliness in high-traffic barn and facility openings. The overlapping strips allow easy passage for people and equipment while minimizing energy loss and contamination. They’re ideal for separating temperature zones or blocking drafts without restricting movement.
Key Feature
Clear vinyl strips for visibility and light transmission
Product Features
- Overlapping design forms a thermal seal
- Flexible in cold temperatures and UV-stabilized
- Easy to install and replace individual strips
- Reduces energy loss and airborne contaminants
- Available in multiple sizes and thicknesses
Uses
Creates a flexible barrier to retain heat and block wind, dust, and pests
Ideal For
Barn entrances, feed rooms, and livestock buildings with frequent traffic
Description
Vinyl-Strip - 8" width X .080" thick 1300' rolls in stock
Sale Price (Linear ft.)
$1.61
Description
Vinyl-Strip — 120 width X .120" thick 1200' rolls in stock
Sale Price (Linear ft.)
$3.68
Product Resources

| Application | Thickness | Width | Overlap |
|---|---|---|---|
| For openings to 8′ in height: | .080″ | 8″ | 1/2 |
| — people, animals and push-type carts | .080″ | 8″ | 2/3 |
| — vehicles and power feed carts, or if temperature difference between adjacent areas | .080″ | 12″ | Full |
| — winds or constant equipment traffic | .120″ | ||
| For openings from 8′-14′ in height: | |||
| — interior applications | .120″ | 12″ | 1/2 |
| — temperature difference between adjacent areas | .120″ | 12″ | 2/3 |
| — winds or constant equipment traffic | .120″ | 12″ | Full |
Click here for printable worksheet of the table below.
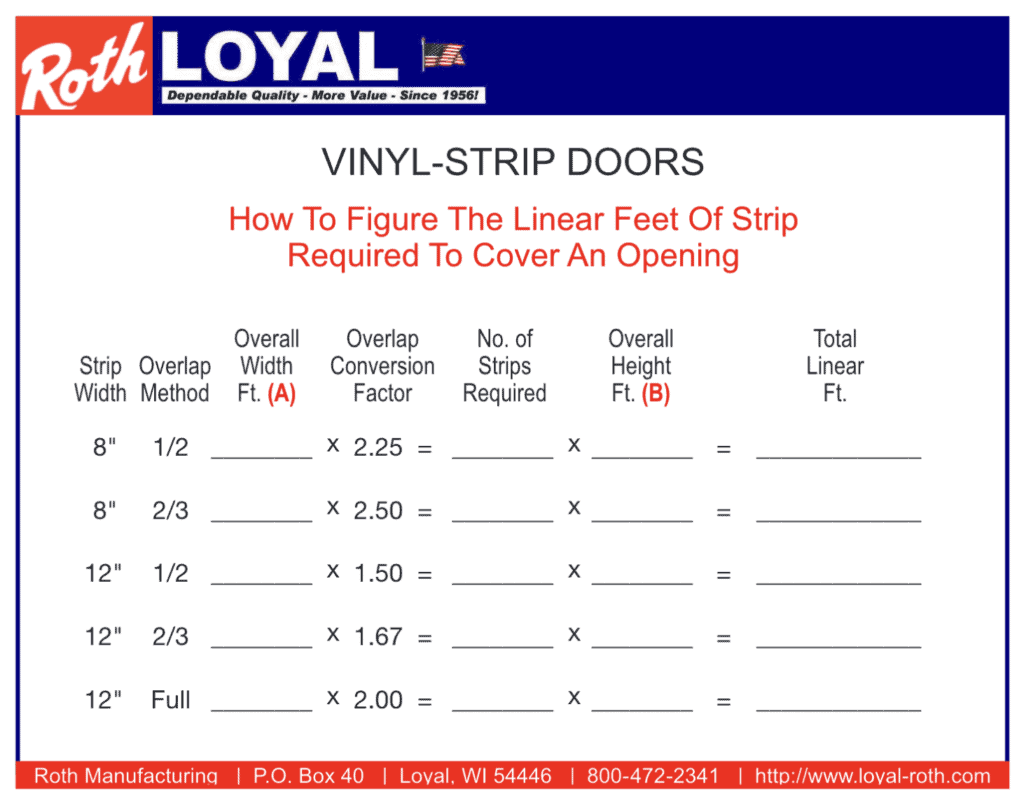
(A) Overall Width = opening width plus 6″ on each side for better thermo seal
(B) Overall Height = floor to top of mount. Strips should not touch floor… so strips hang straight for good thermal seal… and to prevent strips from freezing to debris on floor.
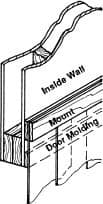
- Reverse every-other vinyl strip
- Sandwich vinyl strips between two- 1x3, 1x4, or 1x6 mount boards, and bolt, screw or nail mount boards together (3" hole spacing, starting 1" from end)
- Assembled mount is then attached to interior wall, with bottom of mount located 3" above door molding (use 1/2" dia. fasteners spaced every 12", starting 2" from end)
NOTE: Attachment to wall vs. door molding provides better thermal seal at the top of door, and reduces risk of tearing strips off mount, or hitting mount. Allow minimum of 18″ between objects going through door and bottom of mount — this may require locating bottom of mount further above door molding than the recommended 3″.